Spring Information
Heavy Springs
'CROM' - the god of springs! (chrome spring). This is about three levels stronger than the Dipped black, Gold, Black or Red/Black, and is supplied with the new V2 Grippers.
-----------------------------------------------------------------
Wasp coloured (Black with a yellow stripe). This is about one level stronger than the Gold, Black or Red/Black, and is supplied with Batch 9 - of the Vulcan Hand Grippers. These springs are specially manufactured for these machines. These springs are no longer available.
-----------------------------------------------------------------
Black. This is about a 10% stronger spring than the Red spring, and is supplied with Batch 6, of the Vulcan Hand Grippers, and later the Vulcan V2's.
Black with a lime green and red ends - the Joker spring. These are equivalent to the Gold, Black or Red/Black spring. [These springs are used at the 2013 World's Strongest Hands contests]. Two springs are available.
Black/gold end. These are equivalent to the Gold, Black or Red/Black spring. [The Black/gold end spring are the tested black springs available to the nine promoters (plus spare). These springs were used at the 2012 World's Strongest Hands contests]. These springs are not available.
Dipped black (silver with one end dipped in black metal paint). These are equivalent to the Gold, Black or Red/Black spring and have been newly coloured to identify them for use in the World's Strongest Hands 2011. These springs are no longer available.
Gold. This is about a 10% stronger spring than the Red spring. [The Gold spring is from a batch of 103 springs run off at the same time. These springs were used at the 2010 World's Strongest Hands contests]. These springs are no longer available.
Red/Black. This is about a 10% stronger spring than the Red spring, and was supplied with Batch 3 and 4 of the Vulcan Hand Grippers. These springs are no longer available.
-----------------------------------------------------------------
Red. These springs were supplied with Batch 1, 2 and 5 of the Vulcan Hand Grippers. These springs are no longer available.
Training springs
Yellow. This is a 10% weaker spring than the red spring.
Blue. This is a 20% weaker spring than the red spring.
Orange. This is a 40% weaker spring than the black spring.
White. This is a 60% weaker spring than the black spring.
Each year we test the World's Strongest Hands springs for the promoters, so that all springs sent to the promoters are exactly the same.
Here are the figures from 2013 (black with a lime green and red ends - the Joker spring).
Increase in spring length. -- Weight hanging
34.01mm -- 30.53k
45.75mm -- 40.83k
57.75mm -- 50.98k
69.75mm -- 61.08k
Here are the figures from 2012 (black spring/gold end).
Increase in spring length. -- Weight hanging
36.04mm -- 31.95k
48.58mm -- 42.25k
60.58mm -- 52.4k
75.58mm -- 63.05k
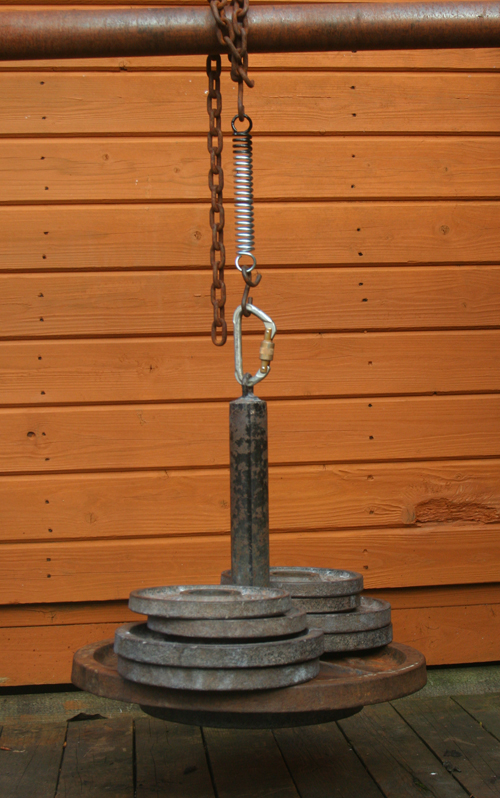
Here are the figures from 2011 (Dipped black spring), and a picture of how we test them, so that all springs sent to the promoters are exactly the same:
Increase in spring length. -- Weight hanging
37.8mm -- 33.6k
53.3mm -- 43.95k
67.3mm -- 54.05k
75.3mm -- 59.2k
82.8mm -- 64.2k
The spring levels with a 'CROM' (chrome) spring are;
LEVEL 27 (both springs attached to #8 notches)
LEVEL 26 (front spring attached to #8 notch, and the rear spring attached to #7 notch)
LEVEL 25 (front spring attached to #7 notch, and the rear spring attached to #8 notch)
LEVEL 24 (both springs attached to #7 notches)
LEVEL 23 (front spring attached to #7 notch, and the rear spring attached to #6 notch)
LEVEL 22 (front spring attached to #6 notch, and the rear spring attached to #7 notch)
LEVEL 21 (both springs attached to #6 notches)
LEVEL 20 (front spring attached to #6 notch, and the rear spring attached to #5 notch)
LEVEL 19 (front spring attached to #5 notch, and the rear spring attached to #6 notch)
LEVEL 18 (both springs attached to #5 notches)
LEVEL 17 (front spring attached to #5 notch, and the rear spring attached to #4 notch)
LEVEL 16 (front spring attached to #4 notch, and the rear spring attached to #5 notch)
LEVEL 15 (both springs attached to #4 notches)
LEVEL 14 (front spring attached to #4 notch, and the rear spring attached to #3 notch)
LEVEL 13 (front spring attached to #3 notch, and the rear spring attached to #4 notch)
LEVEL 12 (both springs attached to #3 notches)
LEVEL 11 (front spring attached to #3 notch, and the rear spring attached to #2 notch)
LEVEL 10 (front spring attached to #2 notch, and the rear spring attached to #3 notch)
LEVEL 9 (both springs attached to #2 notches)
LEVEL 8 (front spring attached to #2 notch, and the rear spring attached to #1 notch)
LEVEL 7 (front spring attached to #1 notch, and the rear spring attached to #2 notch)
LEVEL 6 (both springs attached to #1 notches)
The spring levels with a 'Wasp' (black with a yellow stripe) spring are;
LEVEL 25 (both springs attached to #8 notches)
LEVEL 24 (front spring attached to #8 notch, and the rear spring attached to #7 notch)
LEVEL 23 (front spring attached to #7 notch, and the rear spring attached to #8 notch)
LEVEL 22 (both springs attached to #7 notches)
LEVEL 21 (front spring attached to #7 notch, and the rear spring attached to #6 notch)
LEVEL 20 (front spring attached to #6 notch, and the rear spring attached to #7 notch)
LEVEL 19 (both springs attached to #6 notches)
LEVEL 18 (front spring attached to #6 notch, and the rear spring attached to #5 notch)
LEVEL 17 (front spring attached to #5 notch, and the rear spring attached to #6 notch)
LEVEL 16 (both springs attached to #5 notches)
LEVEL 15 (front spring attached to #5 notch, and the rear spring attached to #4 notch)
LEVEL 14 (front spring attached to #4 notch, and the rear spring attached to #5 notch)
LEVEL 13 (both springs attached to #4 notches)
LEVEL 12 (front spring attached to #4 notch, and the rear spring attached to #3 notch)
LEVEL 11 (front spring attached to #3 notch, and the rear spring attached to #4 notch)
LEVEL 10 (both springs attached to #3 notches)
LEVEL 9 (front spring attached to #3 notch, and the rear spring attached to #2 notch)
LEVEL 8 (front spring attached to #2 notch, and the rear spring attached to #3 notch)
LEVEL 7 (both springs attached to #2 notches)
LEVEL 6 (front spring attached to #2 notch, and the rear spring attached to #1 notch)
LEVEL 5 (front spring attached to #1 notch, and the rear spring attached to #2 notch)
LEVEL 4 (both springs attached to #1 notches)
The spring levels with a Dipped black end, Black, Gold, Black/gold end, Red/Black or 'Joker' spring are;
LEVEL 24 (both springs attached to #8 notches)
LEVEL 23 (front spring attached to #8 notch, and the rear spring attached to #7 notch)
LEVEL 22 (front spring attached to #7 notch, and the rear spring attached to #8 notch)
LEVEL 21 (both springs attached to #7 notches)
LEVEL 20 (front spring attached to #7 notch, and the rear spring attached to #6 notch)
LEVEL 19 (front spring attached to #6 notch, and the rear spring attached to #7 notch)
LEVEL 18 (both springs attached to #6 notches)
LEVEL 17 (front spring attached to #6 notch, and the rear spring attached to #5 notch)
LEVEL 16 (front spring attached to #5 notch, and the rear spring attached to #6 notch)
LEVEL 15 (both springs attached to #5 notches)
LEVEL 14 (front spring attached to #5 notch, and the rear spring attached to #4 notch)
LEVEL 13 (front spring attached to #4 notch, and the rear spring attached to #5 notch)
LEVEL 12 (both springs attached to #4 notches)
LEVEL 11 (front spring attached to #4 notch, and the rear spring attached to #3 notch)
LEVEL 10 (front spring attached to #3 notch, and the rear spring attached to #4 notch)
LEVEL 9 (both springs attached to #3 notches)
LEVEL 8 (front spring attached to #3 notch, and the rear spring attached to #2 notch)
LEVEL 7 (front spring attached to #2 notch, and the rear spring attached to #3 notch)
LEVEL 6 (both springs attached to #2 notches)
LEVEL 5 (front spring attached to #2 notch, and the rear spring attached to #1 notch)
LEVEL 4 (front spring attached to #1 notch, and the rear spring attached to #2 notch)
LEVEL 3 (both springs attached to #1 notches)
The spring levels with a Red spring are;
LEVEL 22 (both springs attached to #8 notches)
LEVEL 21 (front spring attached to #8 notch, and the rear spring attached to #7 notch)
LEVEL 20 (front spring attached to #7 notch, and the rear spring attached to #8 notch)
LEVEL 19 (both springs attached to #7 notches)
LEVEL 18 (front spring attached to #7 notch, and the rear spring attached to #6 notch)
LEVEL 17 (front spring attached to #6 notch, and the rear spring attached to #7 notch)
LEVEL 16 (both springs attached to #6 notches)
LEVEL 15 (front spring attached to #6 notch, and the rear spring attached to #5 notch)
LEVEL 14 (front spring attached to #5 notch, and the rear spring attached to #6 notch)
LEVEL 13 (both springs attached to #5 notches)
LEVEL 12 (front spring attached to #5 notch, and the rear spring attached to #4 notch)
LEVEL 11 (front spring attached to #4 notch, and the rear spring attached to #5 notch)
LEVEL 10 (both springs attached to #4 notches)
LEVEL 9 (front spring attached to #4 notch, and the rear spring attached to #3 notch)
LEVEL 8 (front spring attached to #3 notch, and the rear spring attached to #4 notch)
LEVEL 7 (both springs attached to #3 notches)
LEVEL 6 (front spring attached to #3 notch, and the rear spring attached to #2 notch)
LEVEL 5 (front spring attached to #2 notch, and the rear spring attached to #3 notch)
LEVEL 4 (both springs attached to #2 notches)
LEVEL 3 (front spring attached to #2 notch, and the rear spring attached to #1 notch)
LEVEL 2 (front spring attached to #1 notch, and the rear spring attached to #2 notch)
LEVEL 1 (both springs attached to #1 notches)
My rough estimate of the comparison of Levels between the Vulcan Gripper and the IronMind Captains of Crush are:
Revised.
Coc #2 = Lev 7-9
Coc #2.5 = Lev 10-12
Coc #3 = Lev 13-15
Coc #3.5 = Lev 17-19
Coc #4 = Lev 20-22
But this is just a rough estimate. It would take into consideration easy, normal and hard grippers.
Exercises for the Vulcan Hand Gripper
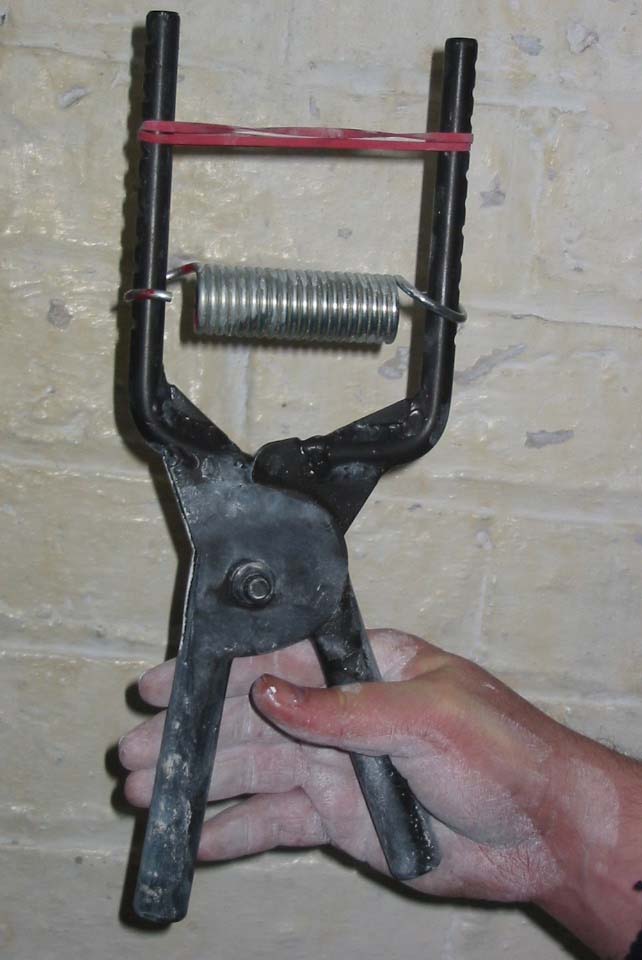
To make it harder, move the spring up the notches away from the pivot. You can move one side at a time, or even keep the spring in the same place and add a rubber band, which will increase the resistance very slowly.
Remember to train both hands.
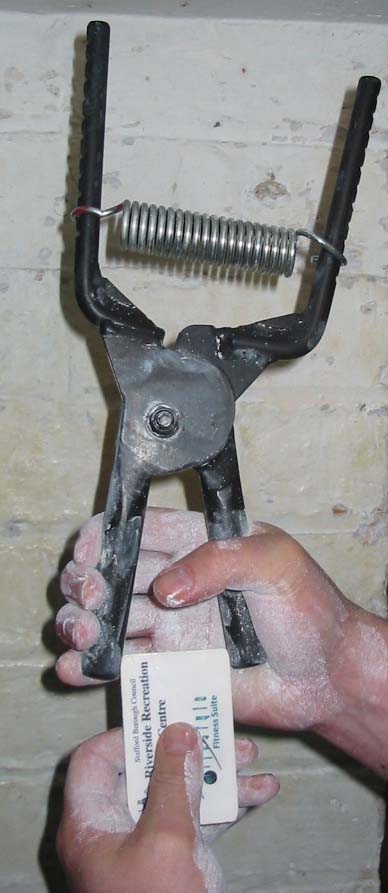
There are 2 recognised distances that people train on the grippers. These are the ‘credit card’ width and 20mm block width. If you insert one of these into the jaws of the gripper before you crush, and for each subsequent repetition, then you know you are starting from the same distance each time. The credit card width trains the ‘sweep’ part of your crush, and the 20mm block trains the final part of your crush. An ordinary credit card or similar can be used, and of course any block that measures 20mm at the end.
So that everyone is playing by the same rules, we shall use the gripper with the numbered handle in the fingertips (this is the handle with the number on the bottom and has the two metal plates attached) - see picture below.

EXERCISES
Normal closures with credit card or 20mm block
Squeeze the handles until they touch.
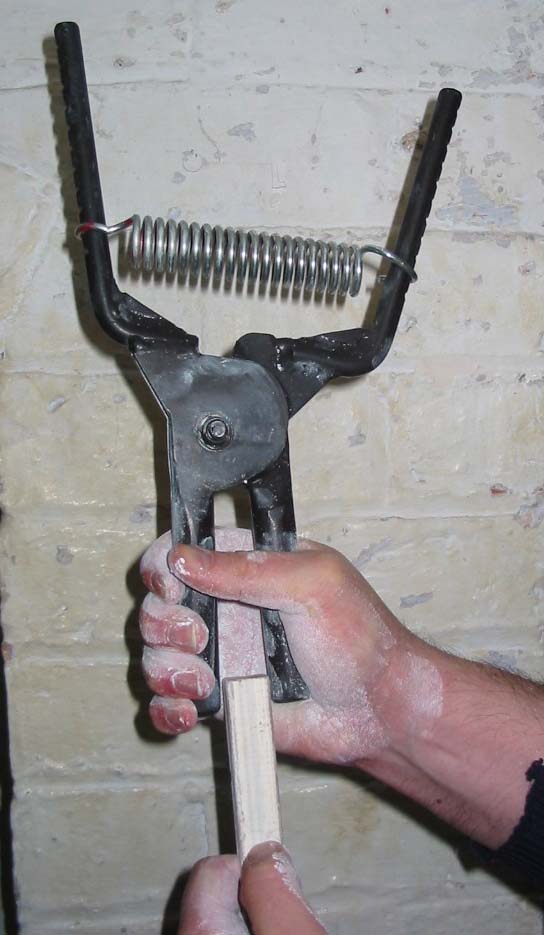
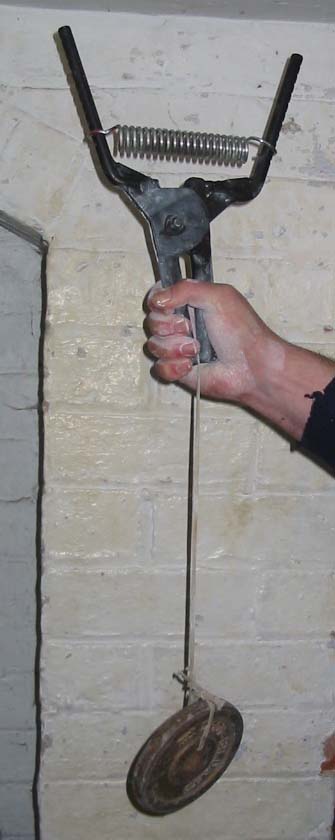
Strapholds using a shoelace with a weight on the end
You hold the shoelace in the jaws of the gripper for as long as possible. You can increase the weight on the lace, or the time held. This builds good endurance.
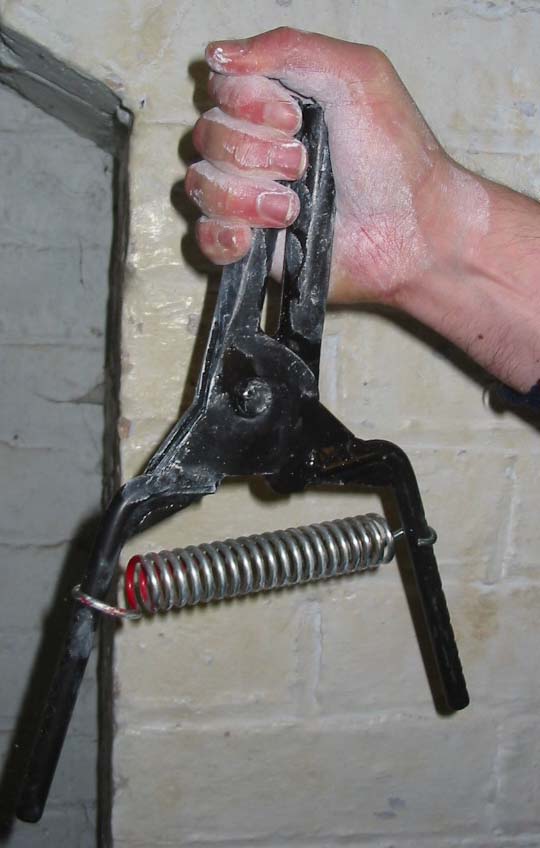
Inverted training on the gripper
Squeeze the handles until they touch, holding the gripper upside-down. This exercise builds more strength in the index and middle fingers and is good for a change.
Using rubber bands to microload
If it's too tough to move the spring on just one side of the gripper then slowly microload by putting one or a few rubber bands on the gripper (see pic), and just the same as the spring, the further these are away from the pivot the tougher it is.